Have you ever struggled with uneven cuts or experienced rapid blade wear during a crucial project? Getting the tooth spacing right is key to achieving optimal cutting performance and extending the life of your blades. Incorrect spacing can lead to poor cut quality and excessive blade wear. By understanding the significance of tooth spacing, you can enhance your cutting efficiency and lower your operational costs.
Choosing the correct tooth spacing and maintaining your cutting tools properly can increase their lifespan by up to 50%. Properly spaced teeth improve the cutting precision across various materials, including metal, plastic, and wood. Given that high-quality cutting tools can range from $50 to $500, investing in their longevity through proper maintenance is a smart economic decision.
Before you get frustrated with inconsistent cuts or consider expensive replacements, take a moment to learn and apply these tips on tooth spacing for optimal cutting!
The Benefits of Proper Tooth Spacing
Proper tooth spacing offers several key advantages:
- Enhanced Cutting Precision: Correct spacing ensures smooth, accurate cuts.
- Extended Blade Life: Proper spacing reduces wear, prolonging blade life.
- Improved Efficiency: Efficient cutting with the right spacing saves time and effort.
- Cost Savings: Long-lasting blades and efficient cuts reduce overall costs.
With the correct tooth spacing, your cutting tools can efficiently handle various materials, making them essential for any workshop or job site.
Understanding Tooth Spacing Components
To achieve optimal cutting performance, it’s important to understand the components related to tooth spacing:
- Blade Teeth: The number of teeth per inch (TPI) affects the smoothness and speed of the cut.
- Material Thickness: The thickness of the material being cut determines the appropriate TPI range.
- Tooth Shape: Different shapes are designed for specific materials and cutting needs.
- Blade Width: Wider blades provide stability, while narrower blades offer precision for detailed cuts.
These factors collectively determine the optimal tooth spacing for your specific cutting requirements.
Determining the Correct Tooth Spacing
Follow these steps to determine the proper tooth spacing:
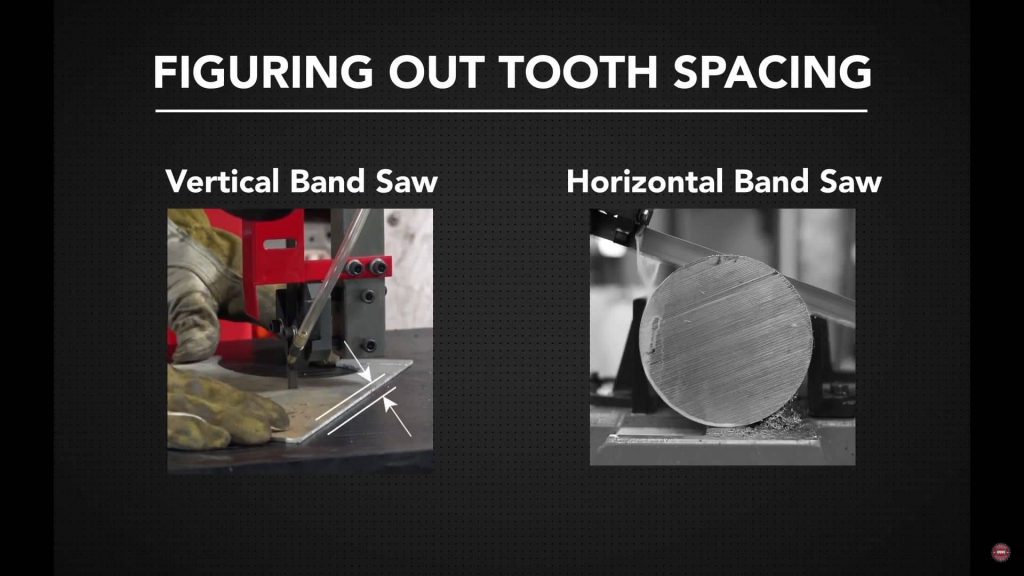
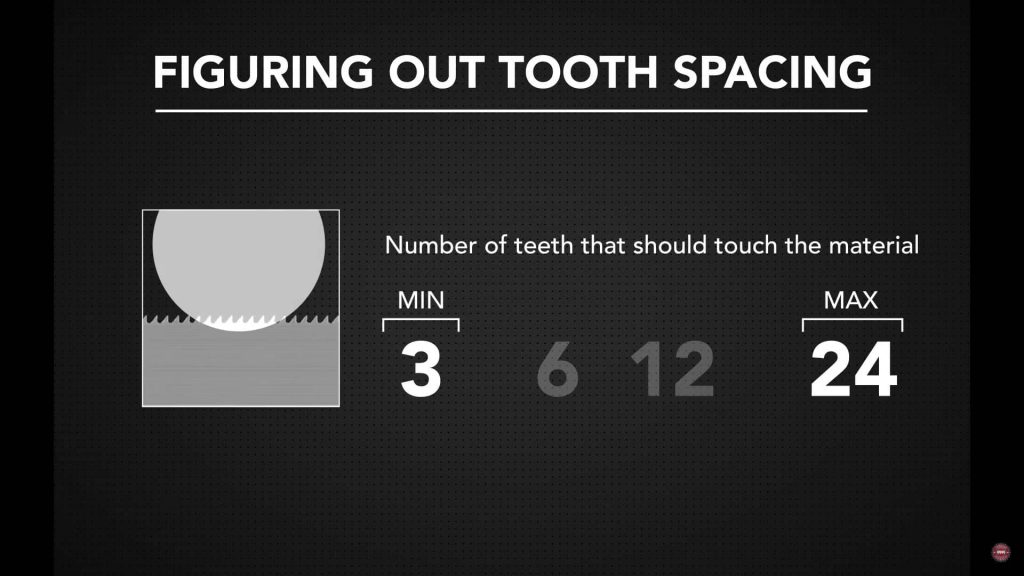
Measuring Material Dimensions
The material’s dimensions influence the choice of blade and tooth spacing. For vertical band saws, measure from top to bottom, and for horizontal band saws, measure side to side. The general guideline is to have at least 3 teeth and no more than 24 teeth in contact with the material at any time. Ideally, aim for 6-12 teeth in contact for the best performance.
Selecting the Right TPI
The TPI of a blade is critical for achieving the desired cutting quality. Here’s a guide for selecting the right TPI based on material thickness:
- Thin Materials (Less than 1/4 inch): Use 18-24 TPI.
- Medium Thickness (1/4 to 1/2 inch): Use 14-18 TPI.
- Thick Materials (1/2 to 1 inch): Use 10-14 TPI.
- Very Thick Materials (Over 1 inch): Use 6-10 TPI.
Choosing the right TPI ensures smoother cuts and prolongs blade life.
Maintaining Optimal Tooth Spacing
Regular maintenance is essential to keep your cutting tools in top condition. Here are some tips:
Inspecting and Cleaning
Regular inspection and cleaning prevent debris buildup, which can affect cutting performance. Use compressed air to blow out dust and a soft cloth to wipe away grime. Pay close attention to the blade teeth, ensuring there are no chips or cracks.
Lubricating the Blade
Proper lubrication reduces friction and prevents overheating. Apply blade lubricant using graphite sticks on the blade’s backside and cutting fluid or wax lubricant on the teeth facing the material.
Adjusting Blade Tension and Tracking
Correct blade tension and tracking are crucial for accurate cuts. Ensure the blade is properly tensioned with a 1/4-inch deflection and runs centered on the wheels.
Maintaining Safety While Cutting
Safety is critical when working with cutting tools. Always wear ANSI-approved safety glasses, cut-resistant gloves, and hearing protection. Keep your work area clean and free of obstructions, and avoid wearing loose clothing or jewelry that could get caught in the blade.
Using Protective Equipment
- Eye Protection: Wear shatterproof safety glasses.
- Hand Protection: Use cut-resistant gloves.
- Hearing Protection: Wear earplugs or earmuffs.
Keeping Your Work Area Safe
- Secure small or awkwardly shaped materials.
- Ensure a non-slip surface to avoid falls.
- Keep flammable liquids away from the cutting area.
Discover More at SawbladeUniversity
For more in-depth information and additional resources on cutting tools and techniques, visit the SawbladeUniversity website. Here, you’ll find a wealth of tutorials, guides, and expert tips to help you master your cutting projects. Whether you’re a beginner or a seasoned professional, SawbladeUniversity offers valuable insights to enhance your skills and knowledge. Don’t miss out on the opportunity to learn from industry experts – explore the SawbladeUniversity website today!
Watch the Tutorial Video for Expert Guidance
For a comprehensive visual guide on figuring out tooth spacing, check out the tutorial video “Figuring Out Tooth Spacing” by SawbladeUniversity on YouTube. This video provides step-by-step instructions and expert tips to help you select the right tooth spacing for your cutting needs. Whether you’re a novice or an experienced professional, this tutorial will enhance your understanding and improve your cutting efficiency. Don’t miss out on this valuable resource – watch it now and take your cutting skills to the next level!
Explore the Benefits of Cold Working
Interested in learning about how cold working can enhance the properties of materials? Check out our in-depth article, “What Is Cold Working and Its Impact on Materials.” This article delves into the process of cold working, its benefits, and how it affects the strength and durability of various materials. Expand your knowledge and discover how cold working can be applied to your projects for improved results. Read the full article to gain valuable insights into this essential manufacturing process!