Getting Your Bandsaw Guides Right From the Start
A bandsaw is only as accurate as its guide system allows it to be. When blades wander, cuts drift, and wood burns instead of slicing cleanly, the problem often traces back to guide setup rather than blade quality or operator technique. Proper bandsaw guide setup creates the stable foundation your blade needs to track true and deliver consistent results across resawing operations, curve work, and straight cuts alike. This guide walks through the practical steps and specific adjustments that transform a poorly tracking bandsaw into a precision cutting tool, focusing on the alignment principles and clearance settings that experienced woodworkers rely on daily.
Signs Your Bandsaw Guides Need Adjustment
- The blade drifts to one side during straight cuts, requiring constant steering pressure
- You notice uneven wear patterns on the blade teeth or the blade body itself
- Burning marks appear on cut surfaces, especially during resawing
- The blade makes clicking or rubbing sounds against the guide components
- Cut surfaces show washboard patterns or inconsistent smoothness
- The blade tends to twist or flutter during cuts, particularly in thicker stock
- You find yourself compensating with fence angle adjustments to achieve straight cuts
Understanding Centerline Alignment
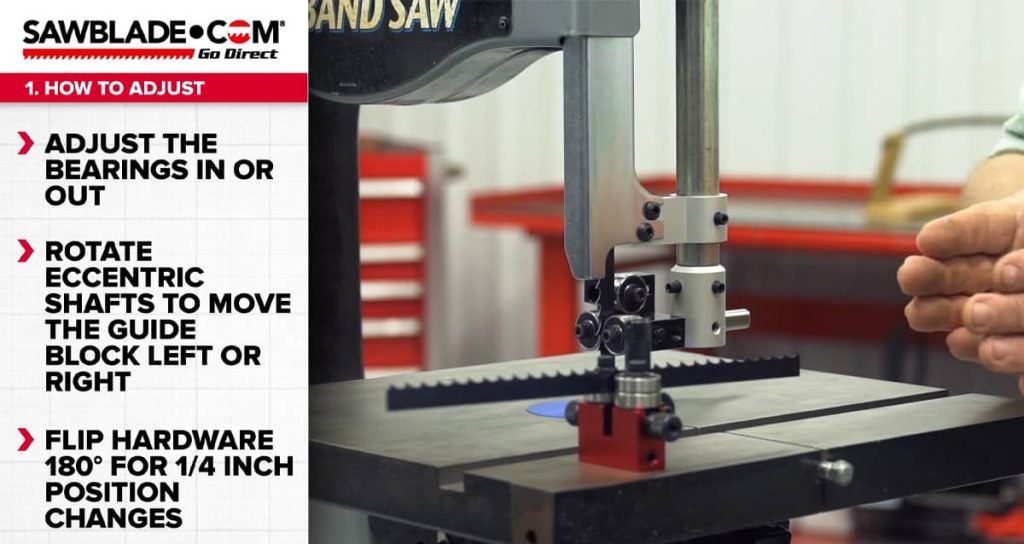
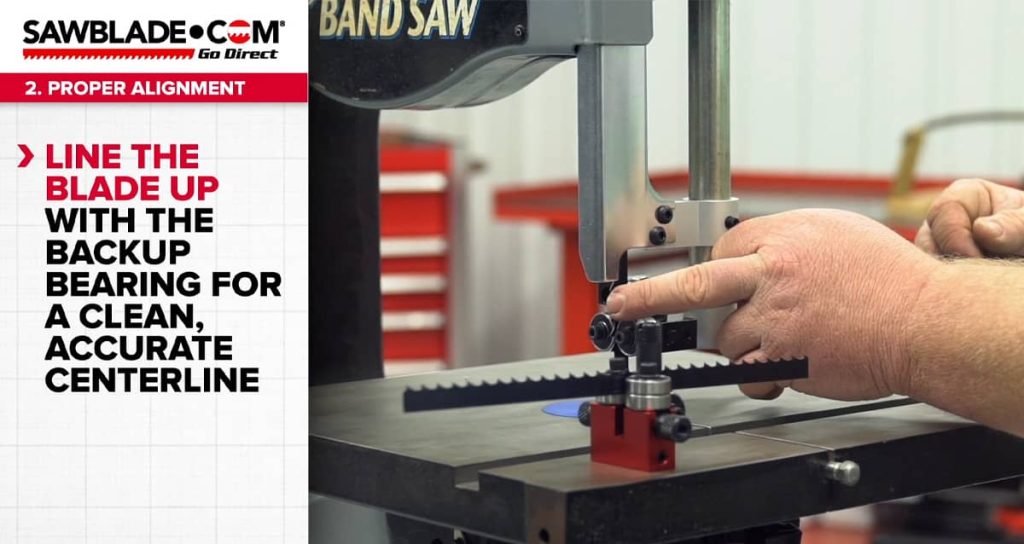
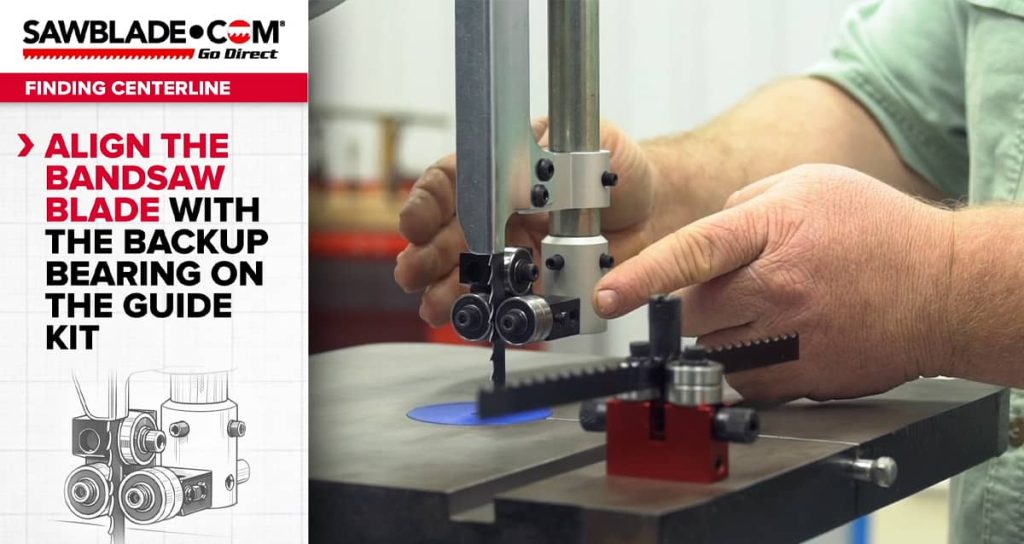
The centerline represents the optimal position where your blade sits properly aligned with the guide system’s backup bearing. Think of it as the sweet spot where the blade receives balanced support from both side guides while maintaining correct contact with the thrust bearing behind it. When centerline alignment is off, even by small amounts, the blade experiences uneven forces that cause tracking problems and premature wear. Getting this alignment right is the single most important adjustment in the entire bandsaw guide setup process, and it applies whether you are installing a fresh guide kit or fine tuning an existing system that has drifted out of specification over time.
Quick Check
What common household item works well for setting bearing clearance during guide alignment?
Why Proper Guide Setup Affects Every Cut You Make
The relationship between guide alignment and cut quality is direct and measurable. Correctly positioned guides create a stable blade path that reduces side to side movement, minimizes blade fatigue, and allows the teeth to cut efficiently without the blade body absorbing unnecessary stress. Poor alignment forces the blade to fight against the guides with every revolution, generating heat, accelerating wear, and producing the drift that frustrates so many bandsaw users. The difference between a well adjusted guide system and a neglected one shows up immediately in the cut surface quality, the amount of feed pressure required, and how long your blades last before replacement becomes necessary.
Bandsaw Guide Component Reference
| Component | Function | Adjustment Type | Common Issues |
| Side Guide Bearings | Support blade laterally, prevent twisting | In and out positioning | Too tight causes friction, too loose allows drift |
| Thrust Bearing | Supports blade from behind during cuts | Forward and back positioning | Constant contact causes flat spots, too far back offers no support |
| Guide Post | Sets overall guide height relative to workpiece | Vertical adjustment | Set too high reduces blade stability |
| Lower Guides | Mirror upper guide function below the table | Same as upper guides | Often neglected, equally important |
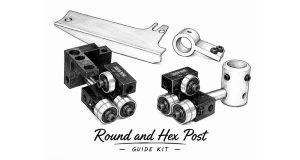
| Eccentric Mounting Hardware | Allows fine calibration of bearing position | Rotational adjustment | Seized hardware prevents precise setup |
The Role of Thrust Bearings in Blade Tracking
Thrust bearings serve as the backstop that prevents your blade from being pushed rearward under cutting pressure. The correct position places the thrust bearing close enough to engage when cutting force is applied, but not so close that it spins constantly during idle operation. A thrust bearing that contacts the blade continuously will develop flat spots that create vibration and noise, while one positioned too far back offers no meaningful support when you need it most. The ideal setting leaves approximately the thickness of a dollar bill between the blade back and the thrust bearing face when no cutting is occurring. This gap closes naturally under load, giving you support exactly when cutting demands it.
Quick Check
Once your guides are set to basic specifications, the article recommends testing with a few cuts in scrap material.
Step by Step Upper Guide Adjustment Process
- Lower the guide post to approximately one quarter inch above your workpiece height
- Loosen the side guide bearing lock screws to allow lateral movement
- Position the side guides so they support the blade body just behind the tooth gullets
- Use a business card as a feeler gauge between each side bearing and the blade
- Lock the side guides in place while maintaining that paper thin clearance
- Adjust the thrust bearing to sit one paper thickness behind the blade back
- Rotate the wheels by hand to verify the blade tracks without contacting the guides during idle
- Make test cuts in scrap material and refine adjustments based on results
Setting Lower Guide Alignment
The lower guides deserve the same careful attention as their upper counterparts, yet many operators overlook them entirely. These guides support the blade through the portion of its travel where cutting actually occurs, making their alignment directly responsible for how the blade behaves at the point of contact with your workpiece. Access to lower guides requires working in the confined space below the table, which explains why they often go unadjusted even when upper guides receive regular attention. Take the time to apply the same clearance standards and positioning principles to your lower guides, and you will notice improved stability that shows up in cleaner cuts and reduced blade wander.
ALSO WORTH READING
Choosing the Right Guide Upgrade for Your Saw
If you’re considering new blade guides, finding the right fit for your specific bandsaw matters more than you might expect. Not all upgrade kits are universal, and compatibility depends on factors like your saw’s size, age, and original guide system. Our guide on How to Match a Guide Upgrade Kit to Your Bandsaw walks you through the key measurements and considerations to help you get it right the first time.
Using a Business Card for Bearing Clearance
- Select a standard weight business card as your reference gauge
- Slide the card between the side bearing and the blade face
- Adjust the bearing until it just barely contacts the card without deflecting the blade
- Remove the card and lock the bearing in position
- Repeat on the opposite side guide bearing
- Apply the same technique to set thrust bearing clearance behind the blade
- Verify settings by spinning the upper wheel and watching for bearing rotation
- Bearings should remain stationary when no cutting load is present
Quick Check
How many guide types are compared in the adjustment table? Drag to answer.
Troubleshooting Common Tracking Problems
When tracking issues persist after guide adjustment, the problem may extend beyond the guide system itself. Wheel alignment, tire condition, and blade tension all interact with guide setup to determine how well your blade tracks. A crowned wheel with a worn or hardened tire will fight against even perfectly adjusted guides. Similarly, insufficient blade tension allows the blade to wander regardless of how precisely you have positioned your bearings. Selecting the right blade for your application also matters significantly, as a blade too wide for your wheel diameter or too narrow for the cutting task will track poorly no matter how carefully you set up the guides. Address these related factors systematically when guide adjustments alone fail to solve tracking problems.
Maintaining Guide System Performance Over Time
- Check guide alignment monthly or whenever you change blade widths
- Clean bearing surfaces and guide blocks to remove pitch and dust buildup
- Inspect bearings for rough rotation or excessive play and replace as needed
- Verify thrust bearing condition by checking for flat spots or rough patches
- Lubricate any moving adjustment components to prevent seizing
- Keep spare guide bearings on hand for quick replacement when wear becomes evident
- Document your optimal settings for each blade width you commonly use
- Listen for changes in sound that indicate guides have shifted out of alignment
Making Your Bandsaw Work Like It Should
A properly set up bandsaw guide system transforms the cutting experience in ways that compound over every project you complete. Blades last longer, cuts require less effort, and the accuracy you achieve becomes consistent rather than occasional. The time invested in learning these adjustment techniques pays dividends through reduced blade replacement costs, improved cut quality, and the satisfaction of working with a tool that performs predictably. Whether you are resawing thick stock or cutting delicate curves, the principles of centerline alignment, proper bearing clearance, and systematic adjustment remain constant. Quality bandsaw blades paired with correctly adjusted guides represent the foundation of accurate bandsaw work, and mastering this setup process puts professional level results within reach of any dedicated woodworker.