Getting Started with Bandsaw Safety
Learning how to use a bandsaw safely is one of the first skills every woodworker needs to develop before making that initial cut. Unlike some shop tools that demand immediate respect through sheer noise and obvious danger, the bandsaw tends to lull beginners into a false sense of security. It runs relatively quietly, the blade moves in a predictable downward motion, and the whole machine just seems less intimidating than its louder cousins in the workshop. But here is the reality: most bandsaw injuries are completely preventable and almost always trace back to the same handful of recurring mistakes rather than any mechanical failure. The good news is that once you understand these common errors, avoiding them becomes second nature, and the bandsaw transforms into one of the most reliable and enjoyable tools in your shop.
The Most Common Beginner Mistakes When Operating a Bandsaw
When new woodworkers approach the bandsaw for the first time, they tend to make predictable errors that experienced operators learned to avoid years ago. Recognizing these patterns in advance can save you from painful lessons.
- Leaving the upper blade guide positioned too high above the workpiece, which increases blade exposure and breakage risk
- Wearing loose clothing, dangling jewelry, or leaving long hair untied near rotating components
- Skipping safety glasses for what seems like a quick, simple cut
- Attempting tight curves with a blade that is too wide for the intended radius
- Pushing material through the blade faster than the teeth can clear sawdust effectively
- Adjusting blade tension, tracking, or guides while the machine is still running
- Continuing to cut when the blade produces unusual sounds like clicking or grinding
- Reaching across the blade path to grab offcuts or reposition material
- Using dull blades that require excessive force to complete cuts
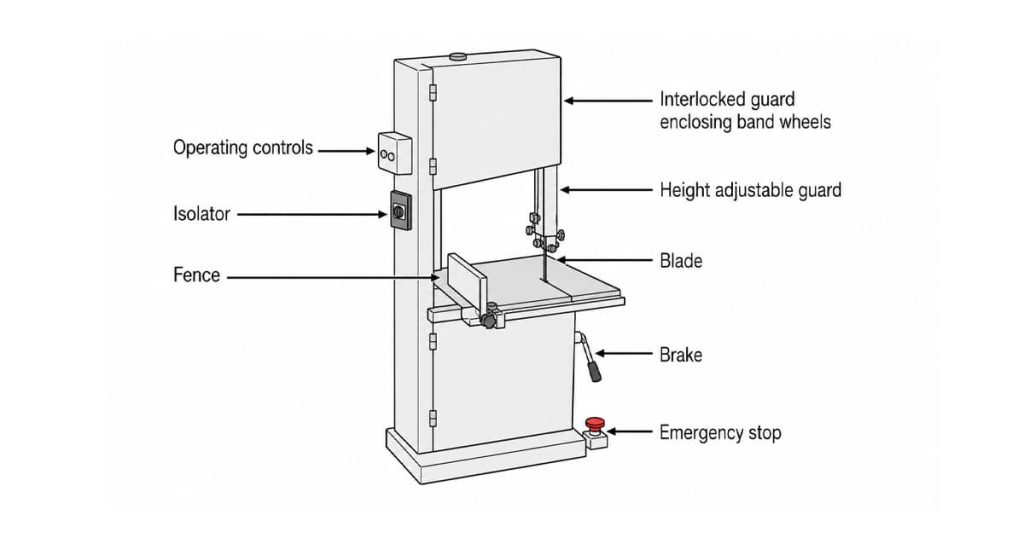
Why Proper Guard Adjustment Matters More Than You Think
One of the most overlooked aspects of bandsaw safety involves the upper blade guard and guide assembly, which many beginners set once and then forget about entirely. The upper guide should sit approximately 1/8 to 1/4 inch above your workpiece surface, close enough to minimize exposed blade but not so close that it contacts the material. When this gap grows to an inch or more, you dramatically increase the amount of unsupported blade between the guide and your workpiece, which makes the blade more prone to twisting, wandering, and potentially breaking under stress. Many woodworkers develop the habit of adjusting this guard before every single cut, treating it like part of the cutting process itself rather than an occasional setup task. This simple practice takes about three seconds and significantly reduces your risk of blade-related accidents. Always power off the bandsaw completely before making any guard adjustments.
Quick Check
Why does a bandsaw blade pose a specific entanglement risk compared to other power tools?
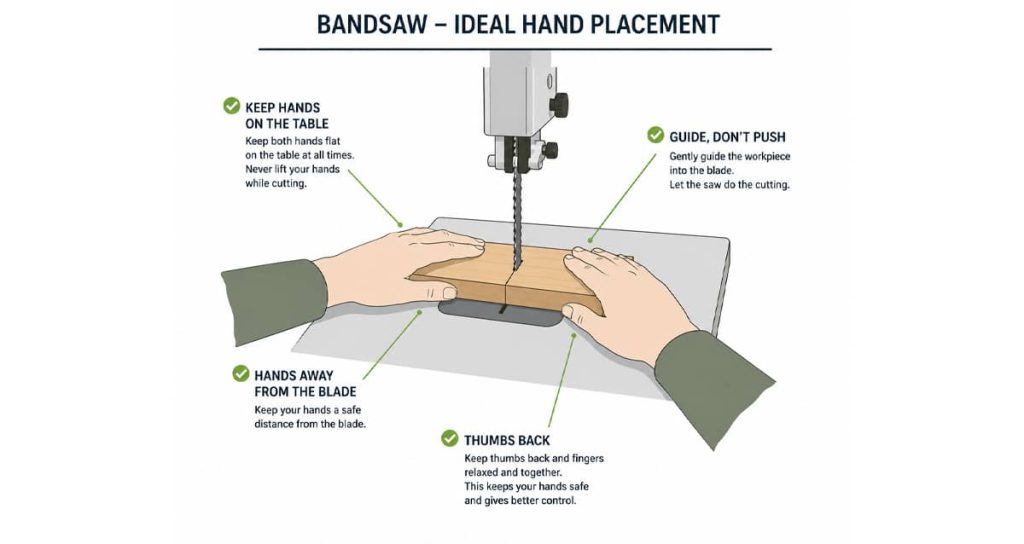
The Four Inch Rule and Smart Hand Positioning
Professional shop instructors consistently teach what has become known as the four inch rule: keep your fingers at least four inches away from the blade at all times during operation. This buffer zone accounts for unexpected blade movement, workpiece shifts, and the natural reaction time humans need to pull away from danger. For smaller workpieces that would put your hands closer than this threshold, use a push stick or push block to maintain control without compromising safety. The instinct to reach across the blade path to grab a cutoff piece or steady material from the opposite side is surprisingly strong, especially when you are focused on following a cut line. Train yourself to always feed material from the same side and wait until the blade stops completely before retrieving anything that has fallen to the wrong side of the table.
Blade Selection Guide for Safe Bandsaw Operation
Choosing the right blade prevents binding, breakage, and loss of control. This table shows appropriate blade widths for common cutting tasks.
| Cutting Task | Recommended Blade Width | Minimum Curve Radius | Notes |
| Straight ripping | 1/2 inch to 3/4 inch | Not applicable | Wider blades track straighter |
| Gentle curves | 3/8 inch | 1.5 inches | Good general purpose size |
| Moderate curves | 1/4 inch | 5/8 inch | Most versatile for curved work |
| Tight curves and scrollwork | 1/8 inch | 3/16 inch | Requires slower feed rate |
| Resawing thick stock | 3/4 inch to 1 inch | Not applicable | Use 2 to 3 TPI for thick cuts |
| Thin materials under 1 inch | 1/4 inch to 3/8 inch | Varies by task | Higher TPI prevents tearout |
Understanding Feed Rate and Why Rushing Causes Problems
The temptation to push material quickly through the bandsaw blade is almost universal among beginners who want to finish projects faster. However, forcing the feed rate causes a cascade of problems that make cutting both more dangerous and less effective. When you push too fast, sawdust cannot clear the blade gullets properly, which causes friction, heat buildup, and premature dulling. The blade begins to wander from your cut line as it struggles to keep up with the material entering its path. In more severe cases, aggressive feeding causes the blade to bind in the kerf, which can strip teeth, snap the blade entirely, or throw the workpiece backward. The correct approach is to apply steady, moderate pressure and let the blade do the work while you simply guide the material. You will hear the difference immediately: a properly fed cut produces a consistent sound, while an overfed cut creates a strained, labored tone that signals you need to slow down.
Quick Check
It is safe to adjust the blade guard or guides while the bandsaw is still powered on, as long as you keep your hands clear.
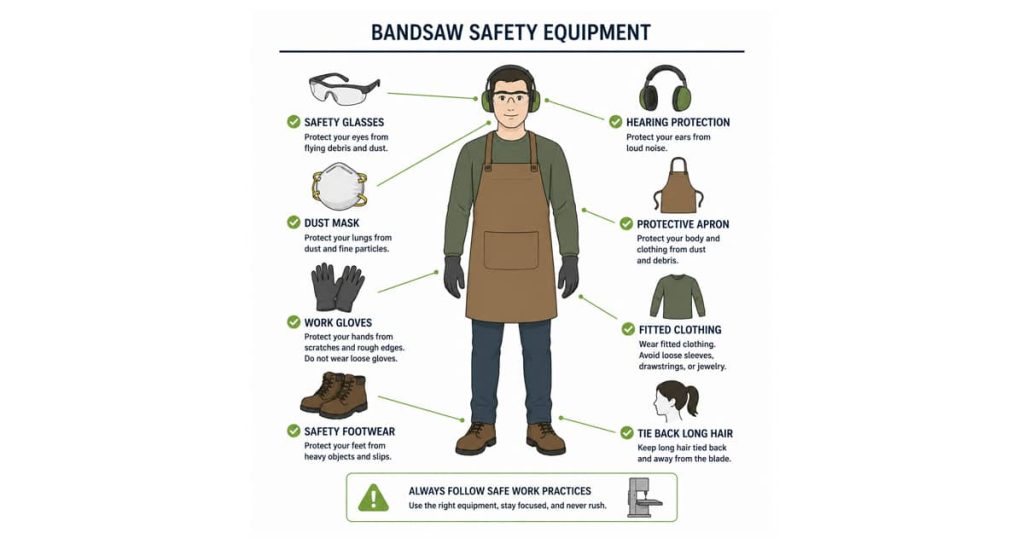
Essential Personal Protective Equipment for Bandsaw Use
Proper safety gear prevents the majority of serious bandsaw injuries according to workshop safety studies. These items should become automatic whenever you approach the machine.
- Safety glasses with side shields to block sawdust and debris from all angles
- Hearing protection for extended cutting sessions, especially when resawing dense hardwoods
- Fitted, short sleeved shirts or sleeves rolled and secured above the elbow
- Closed toe shoes with non slip soles
- Hair tied back securely if it extends past your shoulders
- No rings, bracelets, necklaces, or lanyards that could catch on moving parts
What Those Warning Sounds Are Telling You
Experienced bandsaw operators develop an almost instinctive ability to hear when something is going wrong before it becomes visible or dangerous. A healthy bandsaw produces a consistent, smooth cutting sound that changes predictably based on the material density and feed rate. When you hear clicking, the blade likely has a damaged tooth or has developed a small crack that will eventually cause complete failure. Grinding noises often indicate that the blade is rubbing against a guide bearing that has worn out or shifted out of alignment. Unusual vibration typically means the blade has stretched unevenly, the tracking has drifted, or a wheel bearing is failing. Any of these warning signs demands immediate action: turn off the machine, wait for all movement to stop completely, and investigate the source before resuming work. Ignoring these auditory cues while continuing to cut is one of the fastest paths to a blade break, which can send metal fragments flying unpredictably through your workspace.
ALSO WORTH READING
Want to Get More From Your Bandsaw?
If you’re looking to expand your bandsaw’s capabilities, adding a riser block might be the perfect solution. These simple accessories can significantly increase your cutting capacity, letting you tackle thicker stock without buying a whole new saw. Check out our Bandsaw Riser Block Guide: How They Work and When to Use One to learn whether this upgrade makes sense for your shop.
How to Handle Tight Curves Without Breaking Blades
Cutting curves on the bandsaw requires specific techniques that many beginners never learn, leading to frustration and broken blades. These methods will help you navigate complex shapes safely.
- Match your bandsaw blade width to the tightest radius in your design before starting
- Make relief cuts from the edge of the workpiece to your cut line at regular intervals
- Use nibble cutting to remove waste material in small bites rather than forcing through tight turns
- Back the blade out slowly and carefully if you feel binding, never yank backward quickly
- Consider cutting slightly outside your line and cleaning up with sanders or rasps
- Practice on scrap material first when attempting a new curve radius
Quick Check
According to the safety rule for hand placement, how many inches must your hands stay away from the blade at all times? Drag to answer.
The Danger of Adjusting a Running Bandsaw
Perhaps no single mistake appears more frequently in accident reports than attempting adjustments while the bandsaw blade is still in motion. The urge to quickly tweak blade tension, nudge the tracking, or reposition a guide while the wheels are spinning seems to override common sense for many operators, particularly those working under time pressure. This shortcut has caused countless serious injuries because it places your hands near components that are moving at hundreds of feet per minute. Even a momentary lapse in concentration or an unexpected blade movement can result in contact before you have any chance to react. The proper sequence is always the same: turn off the power, wait for the blade and wheels to come to a complete stop, make your adjustment, verify everything is secure, and only then restart the machine. These extra seconds add almost nothing to your project time but eliminate one of the most dangerous behaviors in bandsaw operation.
Building Safe Habits That Become Automatic
Developing consistent safety routines transforms bandsaw operation from a series of conscious decisions into automatic behavior that protects you without requiring constant mental effort. These habits are worth building from day one.
- Perform a visual inspection of the blade condition before every work session
- Check that wheel covers are fully closed and latched before powering on
- Verify the blade tension and tracking are correct for your current blade
- Clear the table surface of debris, tools, and cutoffs before starting a new cut
- Position your body to the left of the blade, never directly in line with its path
- Turn off the bandsaw when stepping away, even briefly
- Wait for complete blade stop before walking away from the machine
- Keep the area around the bandsaw clear of tripping hazards and clutter
Staying Safe as Your Skills Progress
As you gain experience with the bandsaw, a different kind of risk emerges: overconfidence. The same familiarity that makes operation feel natural can also lead to shortcuts and relaxed attention that would never occur during your first few months. Seasoned woodworkers sometimes develop the habit of removing guards that feel unnecessary, making adjustments without fully stopping the blade, or working with dull blades longer than they should simply because they have gotten away with it before. The reality is that experience does not make you immune to injury; it simply changes the type of mistakes you are likely to make. Maintaining respect for the machine, following the same safety protocols regardless of how routine a cut might feel, and staying alert for warning signs will serve you throughout your entire woodworking practice. The bandsaw can be one of the safest power tools in your shop when operated correctly, and it rewards careful operators with decades of reliable service.